Jenkins Instance and Pipeline Setup Guide
This guide covers the setup of a Jenkins, creating and using pipeline using a Docker-in-Docker architecture and configuring all neccessary steps like credentials and GitHub WebHooks. It’s main purpose is the automatic deployment of Dockerized websites, as described in this guide.
Flow overview
Deployment Flow
├── 1. Code Development
│   └── Writing and testing your application code locally.
├── 2. Push & Trigger
│   └── Pushing code into a specific repository, where GitHub triggers a webhook to Jenkins.
└── 3. Automated Build & Publish
    └── Jenkins takes over the pipeline:
        ├── Pulls the latest code from the repository.
        ├── Pushes the files to the remote server.
        └── Runs the deployment script to auto-create a new website build and publish it live.
How it works
This setup is based on my Jenkins docker-compose setup repo .
Jenkins uses a dedicated service user and SSH keys to securely connect to a remote Linux server.
Instead of granting full root access, Access Control Lists (ACLs) and strict sudoers rules are used to safely execute deployment scripts (like Docker container redeployments) triggered automatically by GitHub webhooks.
Prerequisites
- A running Jenkins instance
Create the Service User & Configure Sudo
Create a new user named jenkins-deploy. For security reasons, this user will not be added to the docker group.
sudo adduser --disabled-password --gecos "" jenkins-deploySetup a Jenkins instance
Clone the jenkins-docker-compose-setup repo and follow the steps in the included README.md
Add deployment script permissions
Grant this specific user the exact permission to run the deployment script as root without a password prompt. Never edit the sudoers file directly! Always use the safe command:
sudo visudoScroll to the very bottom of the file and add this single, strict rule:
jenkins-deploy ALL=(root) NOPASSWD: <path-to-your-file>/deploy.shGenerate SSH Key and configure ACLs
Switch to the new user and generate a secure SSH key pair.
Secure your Key!
Add a secure passphrase when prompted during key generation. Without it, anyone who obtains the key has instant access to your server.
sudo su - jenkins-deploy
mkdir -p ~/.ssh
chmod 700 ~/.ssh

# Generate the key
ssh-keygen -t ed25519 -f ~/.ssh/id_ed25519

# Authorize the public key
cat ~/.ssh/id_ed25519.pub >> ~/.ssh/authorized_keys
chmod 600 ~/.ssh/authorized_keys

# Output the private key to copy it for Jenkins
cat ~/.ssh/id_ed25519
exit
Now, configure Access Control Lists (ACLs) so system services and human users can work together peacefully in the same directory, breaking the classic “one user, one group” rule.
sudo apt-get install acl

# Grant recursive access and set Default Inheritance
sudo setfacl -R -m u:jenkins-deploy:rwx /var/www/vhosts/lpj.app/blog.lpj.app
sudo setfacl -R -m d:u:jenkins-deploy:rwx /var/www/vhosts/lpj.app/blog.lpj.app

# Grant access to the deployment script
sudo setfacl -m u:jenkins-deploy:rwx /var/www/vhosts/lpj.app/redeploy-websites.sh
Configure Jenkins and Add SSH Credentials
Now open the Jenkins Instance in a Browser, when using the jenkins-docker-compose-setup the default port is 8082. Retrieve the initial admin password if you haven’t unlocked Jenkins yet:
docker exec jenkins-blueocean cat /var/jenkins_home/secrets/initialAdminPasswordNavigate to Manage Jenkins > Plugins > Available plugins and install the SSH Agent plugin. Then, add your SSH credentials:
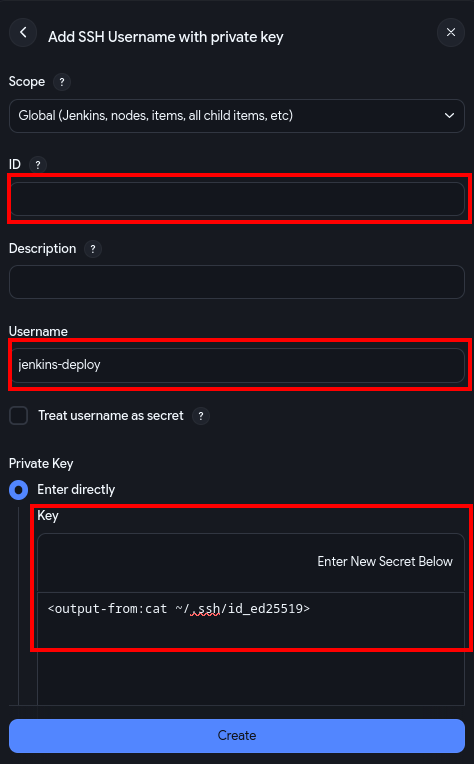
- Go to Manage Jenkins > Credentials > Add Credentials > Add SSH Username with private key.
- Scope: IMPORTANT: Must be set to
Global, NOTSystem. - ID: enter a custom id (This exact string goes into your
Jenkinsfilelater). - Username:
jenkins-deploy - Select “Enter directly”, paste your private key, and enter your passphrase.
Connect Jenkins to GitHub
Jenkins needs authenticated access to your GitHub account to pull your source code. Since GitHub deprecated password authentication for Git operations, you must use a Personal Access Token (PAT).
1. Generate a GitHub Personal Access Token
First, create a token on GitHub that acts as your secure “password” for Jenkins:
- In GitHub, go to Settings > Developer Settings > Personal access tokens.
- Choose your token type:
- Fine-grained tokens: Best for security. Select only the specific repositories Jenkins needs to access.
- Tokens (classic): Easier for multiple projects, but grants broader access. Ensure you select the
reposcope.
- Generate the token and copy it immediately—you won’t be able to see it again.
2. Add Credentials to Jenkins
Now, store that token securely within your Jenkins instance like above:
- Navigate to Manage Jenkins > Credentials > System > Global credentials > Add Credentials.
- Type: Select Username with password.
- Username: Your GitHub username.
- Password: Paste the Personal Access Token you just generated.
- ID: Enter a unique, descriptive slug (e.g.,
github-token-auth). You will reference this ID in your Pipeline configuration.
Using a descriptive ID is very helpful in the future. If you leave it blank, Jenkins generates a random UUID, making your Jenkinsfile much harder to read and maintain.
Create the Jenkinsfile
Place this Jenkinsfile in the root of your Git repositories. It handles checking out the code, syncing files and triggering the remote deployment script.
pipeline {
    agent any

    environment {
        // SERVER CONFIGURATION
        SERVER_IP = "<your-server-ip>"
        SSH_USER = "jenkins-deploy" // Must match the username of your service user on the target server
        SSH_CREDENTIAL_ID = "jenkins-ssh-key-id" // Must match the ID of your SSH credentials in Jenkins

        // PROJECT CONFIGURATION
        TARGET_DIR = "/var/www/vhosts/<path-to-your-website-or-project>"

        // Other environment variables
        CONTAINER_NAME = "my-website-container"
        PORT = "3000"
    }

    stages {
        stage('Checkout Code') {
            steps {
                // Checks out the latest code from the Git repository configured in the Jenkins job
                checkout scm
            }
        }

        stage('Deploy to Server') {
            steps {
                sshagent([SSH_CREDENTIAL_ID]) {
                    // Create the target directory on the server if it doesn't exist
                    sh "ssh -o StrictHostKeyChecking=no ${SSH_USER}@${SERVER_IP} 'mkdir -p ${TARGET_DIR}'"
                    // Sync the project files to the target server, excluding .git and Jenkinsfile
                    sh "rsync -rlvz --exclude='.git' --exclude='Jenkinsfile' ./ ${SSH_USER}@${SERVER_IP}:${TARGET_DIR}/"

                    // Triggering the actual deployment script on the server, passing necessary arguments for the deployment process
                    sh """
                    ssh -o StrictHostKeyChecking=no ${SSH_USER}@${SERVER_IP} '
                        cd ${TARGET_DIR} &&
                        sudo ./deploy.sh Dockerfile.your-image ${CONTAINER_NAME} ${PORT}
                    '
                    """
                }
            }
        }
    }
}
Create a Jenkins Pipeline Job
To now create a deployment automation open Jenkins and:
-
click on New Item in the left sidebar
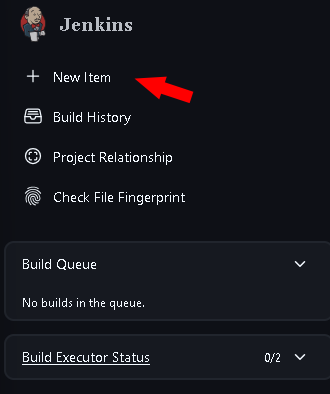
-
Enter a name for your pipeline (e.g.,
test-website-pipeline) and select Pipeline as the project type, then click OK
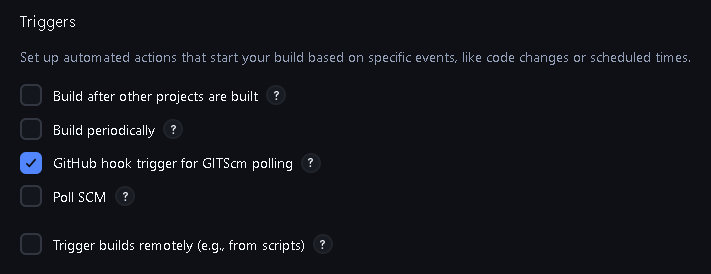
-
Now configure the pipeline: 3.1 In the General section, you can optionally add a description and configure other settings as needed. 3.2 Triggers: If you want to trigger the pipeline automatically on code changes, check “GitHub hook trigger for GITScm polling”
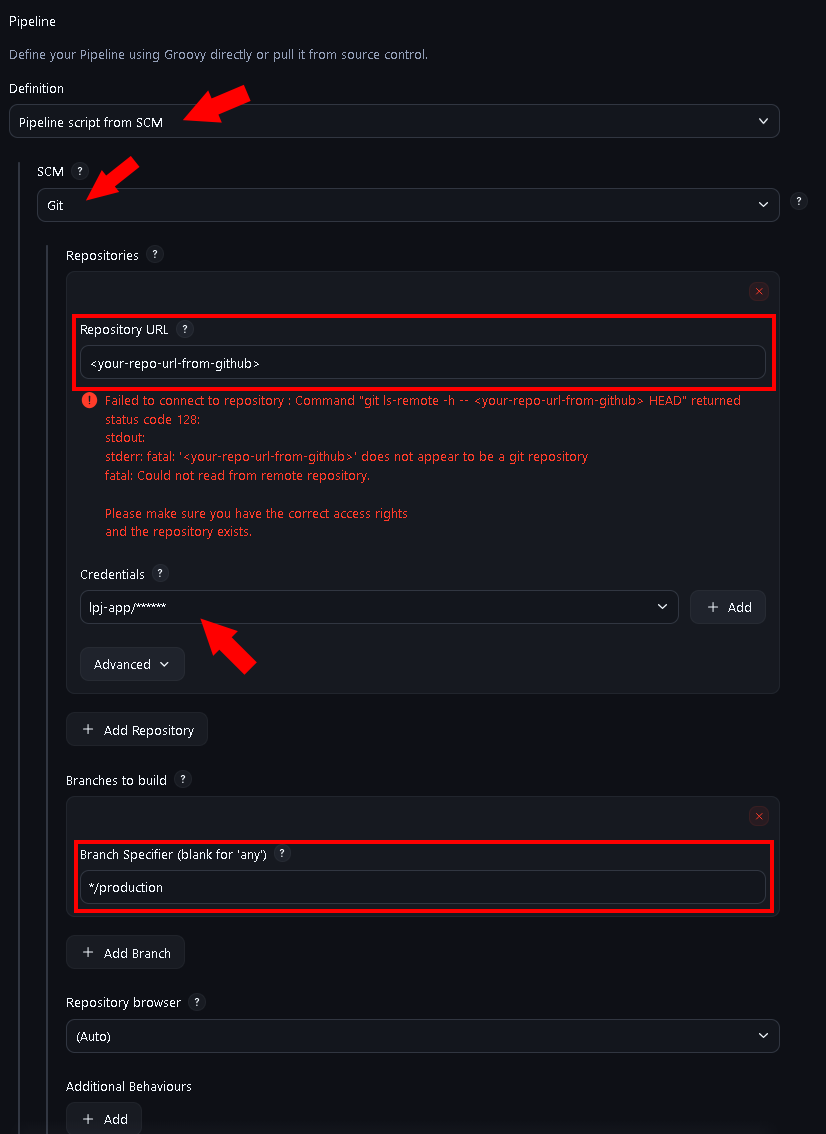
3.3 In the Pipeline section, select “Pipeline script from SCM” and configure your Git repository details (e.g., GitHub URL, credentials if private, and the branch, from where the code should be pulled).
Automate with GitHub Webhooks
To trigger deployments automatically on git push from a custom branch:
- In Jenkins: Open your Pipeline project > Configure > Build Triggers > Check “GitHub hook trigger for GITScm polling”. (done when following the above pipeline setup steps)
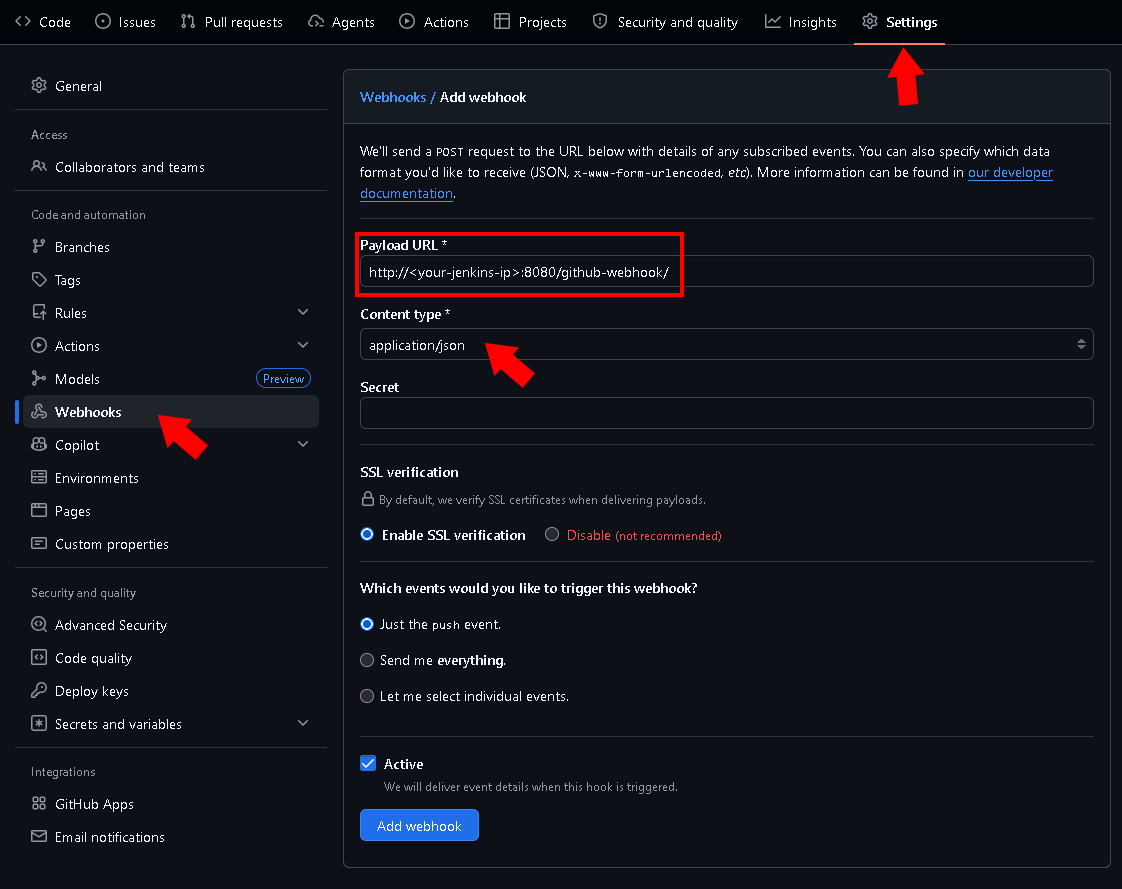
- In GitHub: Go to your Repository Settings > Webhooks > Add webhook.
- Payload URL:
http://<your-jenkins-ip>:8080/github-webhook/(The trailing slash/is mandatory). - Content type:
application/json. - Save. A green checkmark should appear next to the webhook in GitHub.
When your done with everything, go back to Jenkins, open your newly created pipeline and press Build Now to start a manual build. You’ll see the builds state in the bottom section Builds.
If that worked so far, make some changes to your project, push it into the branch for Jenkins and test the auto build.
If something didn’t work as expected, click on the failed build and on the top left on Console Output to see the error logs and troubleshoot the problem. (For more troubleshooting see the common errors below)
Conclusion
And that’s it!
You now have a fully automated Jenkins pipeline that securely deploys your Dockerized applications to a remote server whenever you push code changes (in this scenario).
This setup can also be used for other deployment scenarios, like running tests, building Docker images and pushing them to a registry, or running automated Gradlew-Builds
Troubleshooting Common Errors
If your pipeline fails, check these common deployment errors:
ERROR: [ssh-agent] Could not find specified credentialsEnsure theSSH_CREDENTIAL_IDin yourJenkinsfilematches the ID in Jenkins exactly, and that the Scope is set to Global.rsync: not foundAddrsyncto theapt-get installline in your JenkinsDockerfileand rebuild the container.chmod: changing permissions... Operation not permittedDo not usechmodin your pipeline. Instead, pass the script directly to the sudo interpreter:sudo ./deploy.sh.sudo: a terminal is required to read the passwordDo not usesudoin the Jenkins pipeline shell steps. Grant your SSH user permission to run Docker commands by adding them to the docker group on the target server instead.
Created: 30.03.2026
Last Updated: 31.03.2026